I got one question from UK. He says “I saw your New Year Greeting site. How did you make “the Hole” with FLARToolKit?”
Okay, There is nothing strange for the peoule just viewing it. But if you try to make the same thing like that, it’s a little difficult.
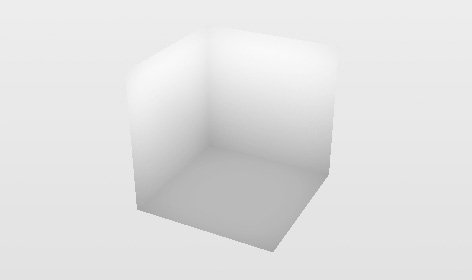
The cube that face normal is point to the internal, become like this:

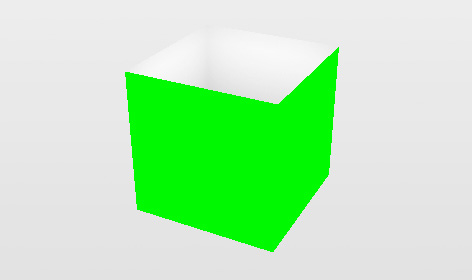
All of the internal is revealed. It must be hidden in the area indicated as green.

Erase the green area (set alpha value to 0), the rest of the area is what you want. Use ColorMatrixFilter to erase the green area.
new ColorMatrixFilter([
    1, 0, 0, 0, 0,
    0, 1, 0, 0, 0,
    0, 0, 1, 0, 0,
    1, -1, 1, 1, 0
])
The reason that I used green (0x00ff00) to indicate unnecessary area is to become transparent with this filter.


I did it!
Place the cube that position and size is same as the hole object to draw the green area. I uploaded live demo and source codes that includes all of these steps.
This technique is like chorma key and have some problems, the same as chroma key. It’s easy to find out the problem to change Stage Quality to HIGH in live demo. Some green edge remains. and other green object (green ball? green monster?) is also become transparent.
英国から質問 1 ついただきましたー。「年賀サイト見たんですけど FLARToolKit で穴あいたような表現ってどうやるんですか?」ですって。
そうねえ。見てるだけだとなんてことない普通の穴なんだけどいざ FLARToolKit (Papervision3D) でやろうとすると難しいっていうね。
何も考えずに穴の内側だからつって法線内向きの Cube を作るとこうなる↓

中が全部見えちゃってる。まあそらそうだ。隠すべきオブジェクトがない。どこを隠さないといけないかつーと↓の絵でいうグリーンの部分。


ここを消せば(アルファ値を 0 にすれば)見えるべき穴の中身だけが残るはず。んでどうやるかってーと↓こういう ColorMatrixFilter を使う。
new ColorMatrixFilter([
    1, 0, 0, 0, 0,
    0, 1, 0, 0, 0,
    0, 0, 1, 0, 0,
    1, -1, 1, 1, 0
])
うえの絵で緑色 (0x00ff00) を使ったのは説明用っていうわけじゃなくってこのフィルタで抜くための色なのでした。このフィルタは 0x00ff00 に近い色ほどアルファ値が低くなるっていうやつ。んでこれを適用しするとこうなる。


できたー、穴の中身だけできたー。(あー背景色もっと暗いのにしとけばよかったみにくいなでもめんどいのでそのまま。)ん、消さないといけない部分の緑色ってのは ColorMaterial(0x00ff00) を設定した Cube の側面だけのやつをちょうど穴オブジェクトと同じ位置に同じサイズで置けばいい。つーわけでそのへんひととおり組んだ動くデモ&ソース。
この方法はあれですねブルーバックで抜くやつみたいな、そんな感じね。んでブルーバックで抜くのと同じような問題がこれにもあって。デモで Stage Quality を HIGH にするとわかるんだけど、レンダリング時にアンチエイリアスをかけるとグリーンのエッジが残るのね。あとグリーン系のオブジェクトは透けるっていう。なのであの年賀サイトではまあデザイン上の理由の法がデカいんだけどグリーンは使ってない。
ってなところで寝る。英語版は明日書こう。
Great tutorial, thanks for explaining!
I worked it out and fixed it in my FLAR project.. only the green cube becomes white. An idea?
And how do you manage dat de cube is ‘under’ the marker, or at the same level as the ‘marker’. Z property won’t work with correction.
And the marker image capturing, like in your NY video..Has it something to do with the ‘FLARRgbRaster_BitmapData’ class?
Thanks Saqoosha, great work.
Timbo,
hmmm, I cannot understand the result what you got…
I uploaded all of source code of New Year Greeting site.
http://saqoosha.net/en/2009/01/08/1677/
Please try to read that source code.
Sweet code, got the cube working now. Only trying to find out how to set the depth of the cube.
Thanks already!
Thanks for releasing the code Saqoosha!!! Awesome work!
Hey Sagoosha.
Great example! I think I’m having the same issue that Timbo was referring to. When I compile your source code the example works except that the ColourMatrixFilter replaces the green with the stage background colour rather than whatever is underneath (such as your background bitmap). Any idea’s what might cause this?
Cheers.
Actually nevermind, I figured it out with the help of Timbo :)
For anyone else experiencing the same issue, you need to set the filter on your pv3d viewport instead. this.viewport.filter = […] rather than this.filter=[…].
Again, cheers for the great example! :D
Yup, great sample! i was wondering about that when i first saw it, but i was thinking of something much more complicated!
Hello..nice work…I have the same problem but I cant set the filter for the viweport because I dont use viewport..what can I do?..the green color now is black color.
Hi All,
Javier I had the same problem. I couldn’t get the effect because I had no viewport… I’m not a coder but I’m interested in AR so I’ve started to using and hacking templates (sorry developer dudes). So I guess you are same kind as me, and I guess you are using the same (or at least similar) template as me. And I have the solution for you:
So basically you have a viewport just you don’t know about it. As I see now this whole thing is not working without viewport. So if you see the 3d object then you have viewport
Ok, where is that than? The template what I’m using is built up from different external ‘as’ files. In the main ‘as’ file there is no viewport definition, but it is defined in another as file (PV3DARApp.as for me).
Find your other as file with the viewport definition. Check for lines like:
import org.papervision3d.view.Viewport3D;
and
new Viewport3D(320, 240
and things like that.
If you find that file than you are almost there.
Now you have to “hack” this file. Put this code to the “import section”:
import flash.filters.ColorMatrixFilter;
Then search for viewport related lines like
this._viewport = this._base.addChild(new Viewport3D(320, 240)) as Viewport3D;
this._viewport.scaleX = 640 / 320;
etc.
Put this code there:
var myElements_array:Array = [1, 0, 0, 0, 0,
0, 1, 0, 0, 0,
0, 0, 1, 0, 0,
1, -1, 1, 1, 0];
var myColorMatrix_filter:ColorMatrixFilter = new ColorMatrixFilter(myElements_array);
this._viewport.filters = [myColorMatrix_filter];
And that’s it. I hope I helped the AR community with this.
BTW thanks for all the developer dudes to put together this fantastic piece of flash!
Oh one more thing.
Just a designer solution again :D So coders skip this message ;)
If you don’t understand this coder language, I will translate it for you:
This whole thing is about using a specific colour as a simple green screen. This case the colour is a specific green colour (00FF00). So whatever is 00FF00 on screen will be transparent.
Ok, why is it good for us? Hehe, ok I have a question: what if the hole is not cubic? What if it’s not a simple mesh but a complicated one? Follow this way and you won’t have a problem:
Use your 3D modeler tool as always. In your texture file find some free space and fill it with 00FF00 colour (just a small area needed).
Create the hole, the shape is doesn’t matter. This will be the “inside” of the hole. Texture it as you want. Than duplicate this object and turn it inside out (reverse vertex order or something like that). This will be the ”outside” of the hole. Now texture it but this case use that small green area on it. And there you go, with the code above it will be transparent even if the shape is a complicated one.
Hi Guys,
Some additional information to the “hole” effect:
If your hole is not perfectly “transparent” but you can see an almost invisible semi transparent green box “below” your marker (around your hole)…
I bet you used jpg format for the green texture. I’ve no idea why but if I’m exporting the green texture from photoshop to a jpg file, the 00ff00 colour is changing to 00ff01. And that’s why is that semi transparent green box is there around your hole. Just use another format (png) and that unwanted green box will disappear.
thanks, Rob. Really helped me.
Awesome!
Successfully implemented it in my own project.
And the input from Timbo and ReDrUm was of great help.
Saqoosha, your a true ActionScript hero.
Amazing work Saqoosha. Thanks again for all the examples and sources.
Merci mille fois.
Hello guys, is there any way to remove the green edge around the hole?
Thanks for the awesomeness Saqoosha!
Hello there!
I have a question.
How can i make the hole in a 3d program like 3dsmax and export it to .dae format?can i make this or only in pv3d?
thank you and greetz from greece
idem dimitrios k
I have the same question.
@dimitrios k:
you can, in fact, that’s how I did it… it doesn’t really matter if the green is from a texture or just a color material…
What I did was create a material in Max, with full green diffuse, then I also set the auto-illumination (emmissive) color to full green, to eliminate the shadowing, thus making it a solid green color.
then I just applied it to the model mask, exported it with OpenCollada (that’s a thing, since Autodesk’s Collada plugin sucks), and put it into Flash…
one thing I also found out, is that you can apply that filter to just the object with the mask (aka, the hole), provided it’s using it’s own container. this is useful to prevent problems like semi-transparent objects outside the hole showing the green behind their alphas…
the drawback is that this approach creates z-sorting problems if you have objects that should come out or go into the hole at some point… since depth-sorting will be done on a container level, your objects will either be entirely behind or entirely over the hole, but never actually inside it.
But I imagine this could work well for most applications…
Cheers
Hi Saqoosha,
A bit off topic but I saw recently your augmented reality cloth video on vimeo (http://vimeo.com/2883790) and was wondering if you can release/share the source code and files for it. Very impressive work and would definitely like to learn how to do similar things.
Many thanks,
Leonidas